Part A
Strike and Dip
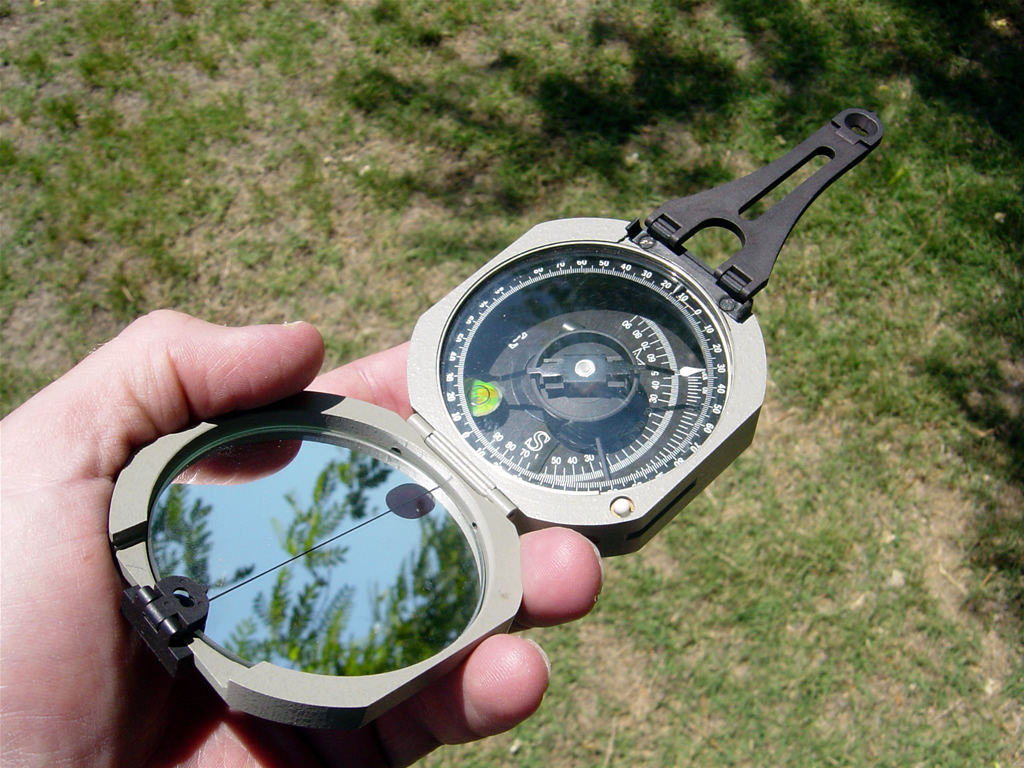
To understand some of the mysteries of Earth's history, geologists use the concept of strike and dip to describe and interpret the orientation of rock units in three dimensions. To accomplish this, a field geologist typically carries a special compass, called a Brunton compass, which can measure tilt angles as well as directions. The images in Figure 9-2 show how strike and dip is visualized and measured by students in the field.
|
|
|
|
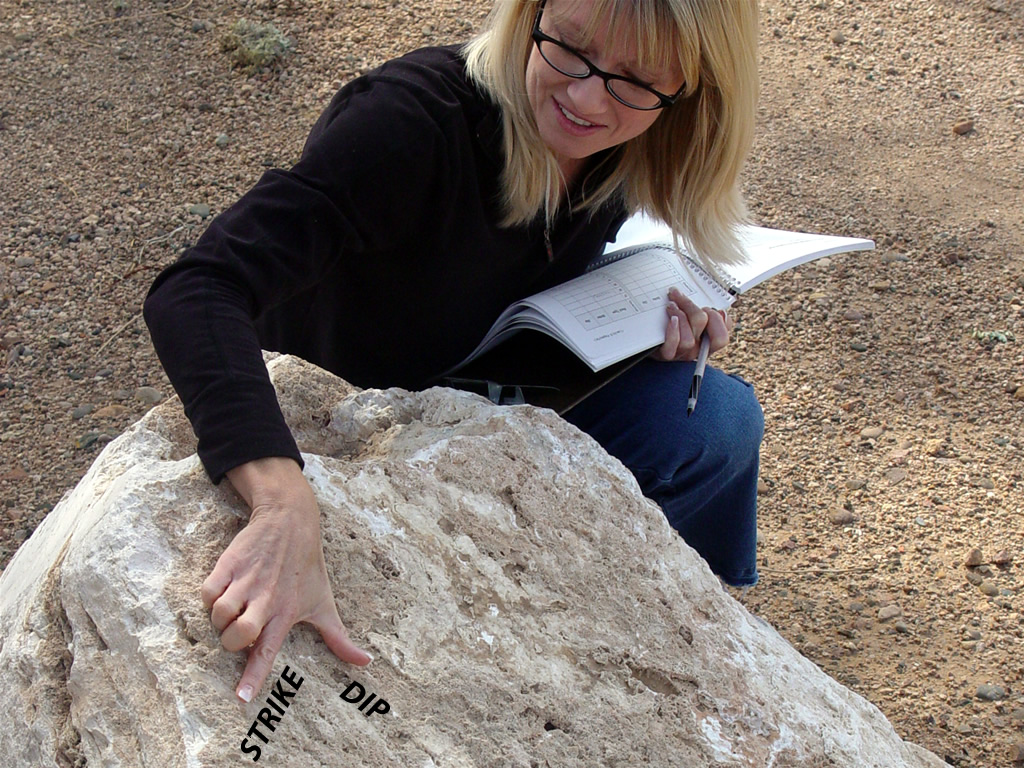
a) Lisa uses her hand to point out strike and dip. |
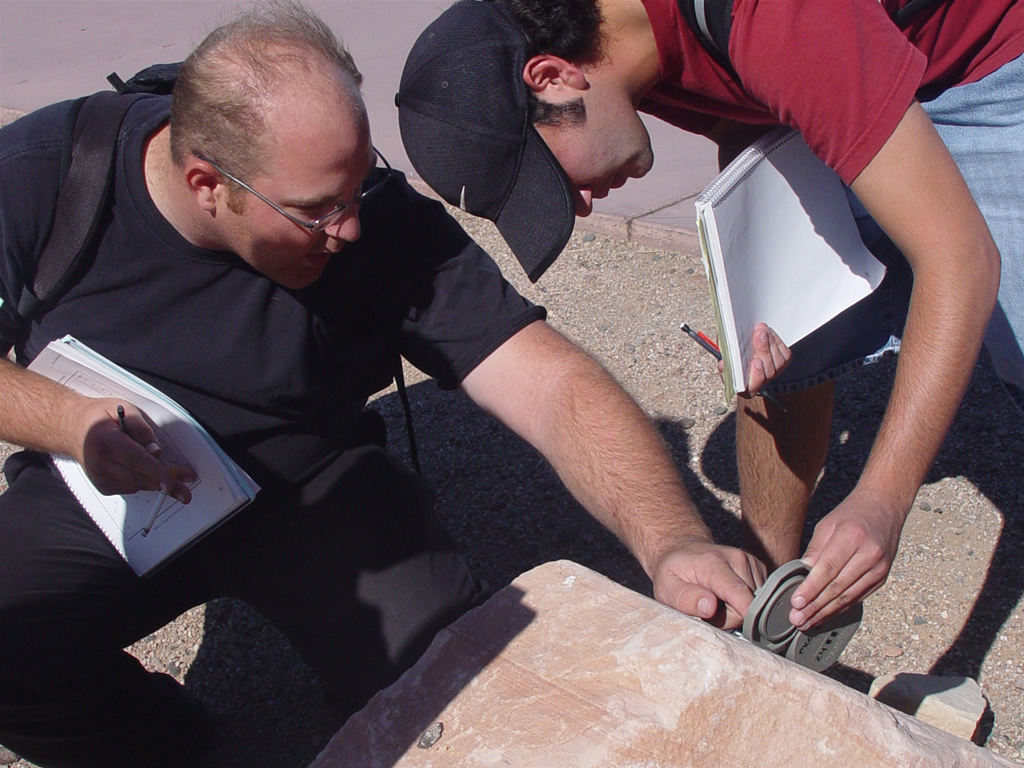
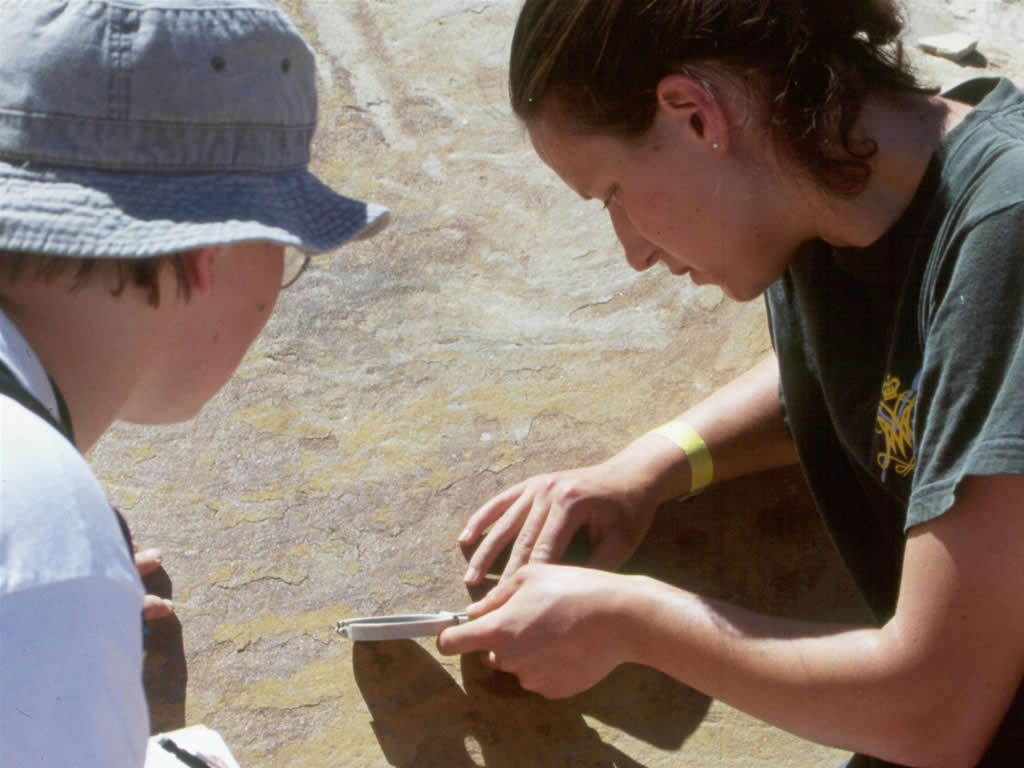
b) Dallin and Dustin measure the dip angle. |
|
|
|
|
|
|
|
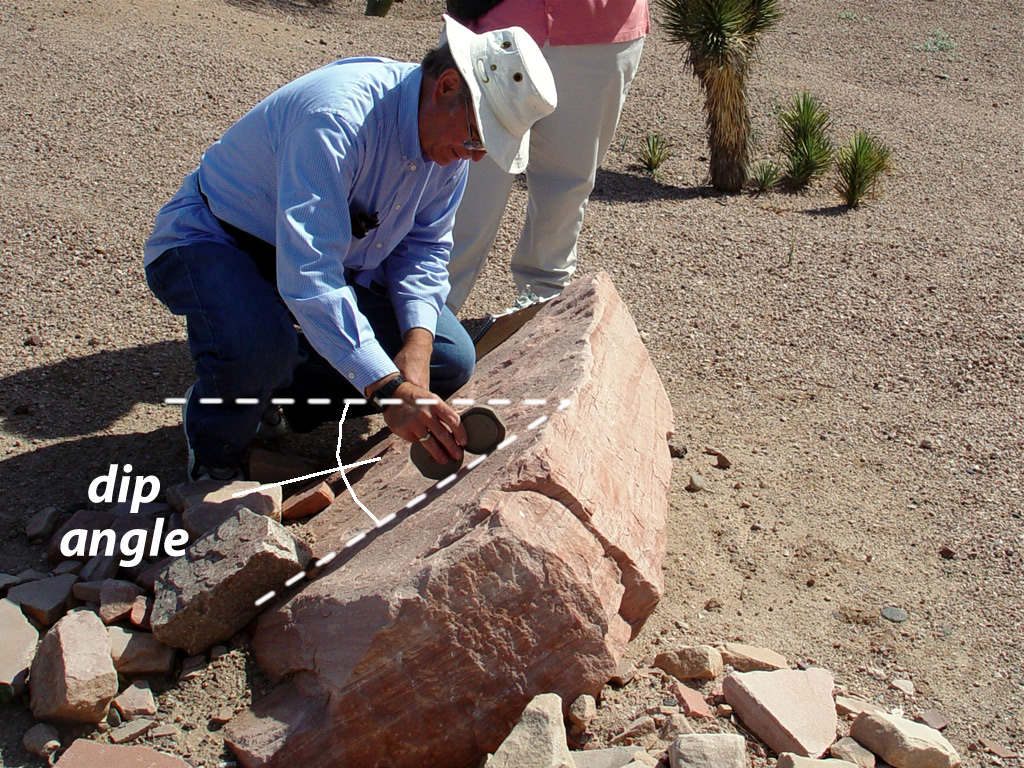
c) Al measures the dip angle on a bedding plane. |
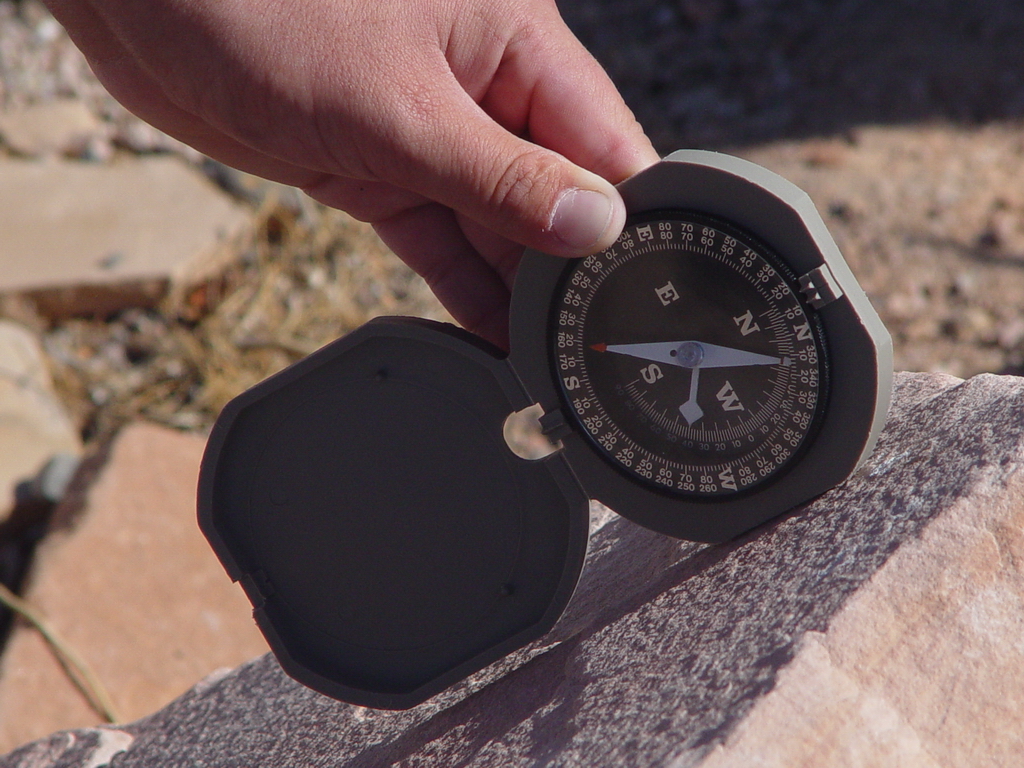
d) The small arrow indicates the amount of dip. |
|
|
|
|
|
|
|
e) The large arrow points in the direction of strike. |
f) Susan and Lisa measure the strike direction. |
|
Figure 9-2. Measuring strike and dip in the field. |
|
Measuring Strike and Dip in the Field
There is a simple process we can use to determine the strike and dip of layered rocks:
1) Which way is north?
> The very first step is to know which direction is north, and consequently, where is northeast, southeast, northwest, and southwest.
2) Which direction are the layers dipping?
> The direction toward which the layers are tilted is the dip direction. This will be either northeast (NE), southeast (SE), northwest (NW), or southwest (SW).
3) Visualize the dip and strike directions with your hand
> Next, before you begin measuring strike and dip with the compass, you can visualize strike and dip with your hands (see Figure 9-2a). On one hand, simply make your thumb and index finger at right angles (like you're making a "gun"). Point your thumb in the direction the layers are dipping (that's the dip direction). Your index finger will be pointing in the strike direction. Easy! All you will be doing with the compass is quantifying your hand measurement.
4) What is the amount of dip (tilt) of the layers?
> Now we measure the amount of tilt (dip), from 0 to 90 °. For example, flat-lying (horizontal) layers are not tilted, so they have a dip of 0°; vertical layers have the maximum dip of 90°. Figures 9-2 b, c, and d show the measurement of the dip angle.
5) Put dip direction and dip amount together
> A typical dip measurement includes both the direction and amount of dip, like 15NE or 72SW.
6) What is the strike direction?
> Once the dip direction is known, strike is easily measured (see Figures 9-2e and f). Strike is the compass direction of the trend of the layers at the Earth's surface. This direction is always perpendicular (at right angles) to the dip direction (see Lisa's hand in Figure 9-2a). Because strike is a compass direction, it is usually expressed relative to north, like "north 25 degrees east (N25E)," or "north 42 degrees west (N42W)".
7) Put strike and dip together
> A strike and dip measurement is written with the strike first, then the dip. An example would be N42W, 72SW.
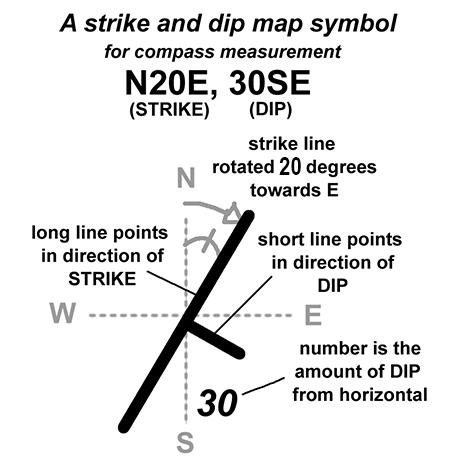
Once the strike and dip of the rock layers has been measured, the orientation must be shown on a geologic map using a strike and dip symbol (see Figure 9-3). In the map view, these T-shaped symbols have a longer line representing the strike direction and a shorter line representing the dip direction. The accompanying number indicates the amount of tilt (or dip angle) of the rock layers in degrees.
|
|
|
|
a) Shane measures strike and dip at a rock outcrop. |
b) Shane's strike and dip info on a map. |
|
Figure 9-3. Shane's strike and dip measurements of a tilted rock layer. |
|
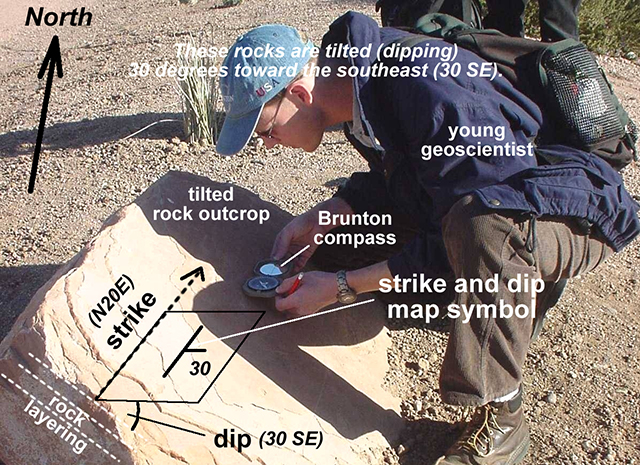
Referring to Figure 9-3, let's look at how Shane measured strike and dip of tilted sandstone layers and how he represented this information on a map.
1) Which way is north?
> Determining the direction of true north was the first thing Shane did. On paper, north is typically toward the top of the page, unless otherwise indicated.
2) Which direction are the layers dipping?
> He found that the layers were dipping toward the SE (southeast). This is the dip direction.
3) Visualize the dip and strike directions with your hand
> Shane pointed with his index finger and thumb to show both the strike and dip directions.
4) What is the amount of dip?
> Using the Brunton compass, Shane measured a dip angle of 30°.
5) Put dip direction and amount together
> Shane figured this was 30SE.
6) What is the strike direction?
> Shane knew that the strike direction is to the northeast because his index finger pointed in that general direction in his hand visualization. Measuring this direction with the Brunton compass yielded a more specific direction of north 20° east or N20E.
7) Put strike and dip together
> Once the strike and dip of the rock layers had been measured, it was written like this: N20E, 30 SE.
8) Draw the strike and dip map symbol
> In the map view, these T-shaped symbols have a longer line representing the strike direction and a shorter line representing the dip direction. The accompanying number indicates the amount of tilt (or dip angle) of the rock layers in degrees.
Reading strike and dip data and symbols
Strike and dip symbols are common features on geologic maps. What do they mean? Well, you will work with strike and dip data in a couple of ways:
1) Determine the strike and dip measurement from a map symbol - You read a map symbol on a map and then determine the strike and dip measurement from it. This is most commonly what you will do in this class.
2) Match a strike and dip symbol with its measurement - You may be given a strike and dip measurement and then have to match it with the correct map symbol.
Additionally, drawing strike and dip symbols is extremely important when you make a geologic map. Although we won't be doing this in this lab, this easy step is done by field geologists who measure strike and dip and then have to draw the symbol on their map.
Determining a strike and dip measurement from a map symbol
First, let's look at how you can get a strike and dip measurement from a map symbol. In the map view, these T-shaped symbols have a longer line representing the strike direction and a shorter line representing the dip direction. The accompanying number indicates the amount of tilt (or dip angle) of the rock layers in degrees. Here are a few simple strike and dip map symbols (dip angle not included):

In each of these symbols, we know the general direction of strike (NE or NW) based soley on which way the longer line is pointing. We also know the direction of dip (NE, SE, NW, SW) based soley on which way the shorter line is pointing.
But we can also get the actual strike measurement from these symbols - we just have to measure the angle between north and the direction of the strike line symbol. We can do this with a protractor as shown below.
Example 1
You see this strike and dip symbol on a geologic map. What's the strike and dip measurement for this map symbol?

Getting dip
1) First, the short line points toward the dip direction (which can be NE, SE, SW, or NW). In this example, it's SE (unless otherwise noted, north is assumed to be towards the top of the page or screen).
2) Next, the number adjacent to the symbol is the dip amount, or the amount of tilt from horizontal towards the dip direction. In this example, it's 22°.
3) Thus, the dip is written as 22SE (you don't include the degree sign, just the number and direction). Now you're halfway done!
Getting strike
4) The strike is simply the compass direction of the strike line (the longer line). Strike is always considered towards the north (either NE or NW). In this example, the compass direction of the strike line is between N and E, so the strike direction is to the NE. We can be more specific, though. The angle between true north and the strike line is 30° (the strike line points 30° to the east of north). In other words, from its true north position, the strike line has been rotated 30° toward the east (clockwise). Thus, the strike is written as N30E (you don't include the degree sign, just the number in the direction).
The final measurement
5) The strike and dip for this example is written like this: N30E, 22SE.
Example 2
You see another strike and dip symbol on a geologic map. What's the strike and dip measurement for this map symbol?

Getting dip
1) Again, the short line points toward the dip direction. In this example, it's SW.
2) Next, the number adjacent to the symbol is the dip amount. In this example, it's 78°.
3) Thus, the dip is written as 78SW (you don't include the degree sign, just the number and direction).
Getting strike
4) In this example, the compass direction of the strike line is between N and W, so the strike direction is to the NW. We can be more specific, though. The angle between true north and the strike line is 65° (the line is 65° to the west of north). In other words, from its true north position, the strike line has been rotated 65° toward the west (counterclockwise).
5) Thus, the strike is written as N65W (you don't include the degree sign, just the number in the direction).
The final measurement
6) The strike and dip for this example is written like this: N65W, 78SW.
Determining a map symbol from a strike and dip measurement
Now let's look at what you do if you are given a strike and dip measurement and need to match it with the correct map symbol. You really need to use a protractor when you do this, although you'll soon become good enough to match the symbol with the measurement by eye. However, if you had to actually draw a map symbol from a strike and dip measurement (which we won't in this lab), a protractor is required.
Example 3
You are given a strike and dip measurement of N40W, 50SW. What does the correct map symbol for this measurement look like?
1) We know the amount of dip is 50, so the number on the symbol should be 50. A map symbol with another number for the dip is not the correct symbol.
2) We also know the dip direction is to the SW, so the shorter dip direction line should be pointed to the SW. A map symbol with the dip line pointing in another direction (i.e., to the NW, NE, or SE) is not the correct symbol.
3) Lastly, the longer strike line should be pointed to the NW, specifically 40° west of true north. You can measure this with a protractor (if necessary). This is the only time you'll need the protractor for this example. A map symbol with the strike line pointing in another direction (i.e., to the NE) is not the correct symbol.
4) The N40W, 50SW map symbol looks like this:

Drawing a map symbol from a strike and dip measurement
Even though you won't be required to actually draw a strike and dip symbol in this lab, here's a brief explanation of how to do it. You would need a protractor, pencil, and paper to do this.
Example 4
You measure the strike and dip of a rock layer as N35W, 30NE. Draw the strike and dip symbol for this measurement.
Drawing the strike line
1) When drawing the map symbol, you need to do the strike line first. Place the protractor's small hole or center point over the place where you'll draw the strike and dip symbol. Lightly mark this location with a small point.
2) Align the straight edge of the protractor so that it's pointed to true north (the top of the page, usually). The 0° point on the outside of the protractor should be at the top. Since your measurement has a strike to the NW, place the protractor so that it makes the shape of a "D". Lightly mark the 0° point.
3) Rotate the protractor 35° toward the west (counterclockwise or to the left) until the 35° marking is aligned with true north. Lightly mark the 35° point. The straight edge of the protractor is now aligned with a N35W strike.
4) Over the location point, draw a line along the straight edge of the protractor. This is your strike line for N35W. You are done using the protractor!
Drawing the dip line & dip amount
5) Draw a shorter dip direction line that points toward the NE (on the right side of the strike line).
6) Add the dip amount (30, with no degree symbol) and you're done!
Now for some questions about strike and dip as related to simple maps and cross sections.